Lesson-CardiacUS

Eyeballing


In emergency cardiac ultrasonography no precise measurements or advanced knobology is needed.

A simple visual qualitative method to evaluate the overall function of the heart and chambers is used.

This method is called eyeballing.

All views can be used for the eyeballing and combined information from different views is recommended.

When eyeballing, always apply suitable humbleness.

Eye-balling for each focused question will be described in further detail.

Tips and tricks
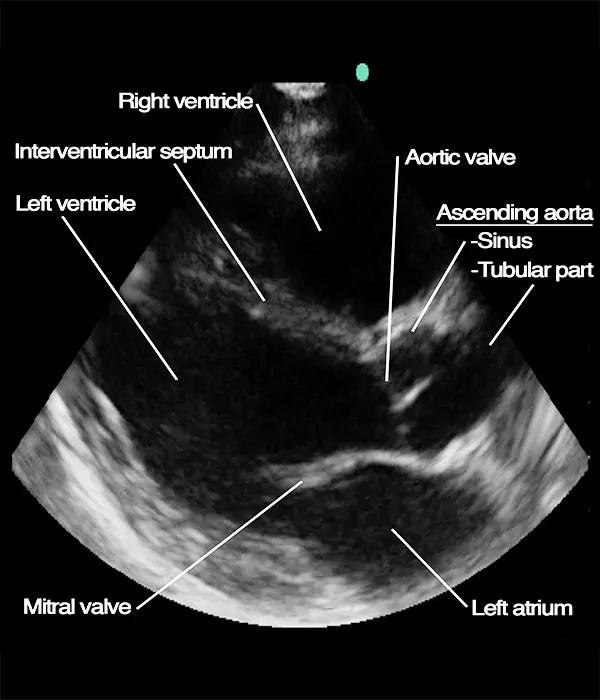
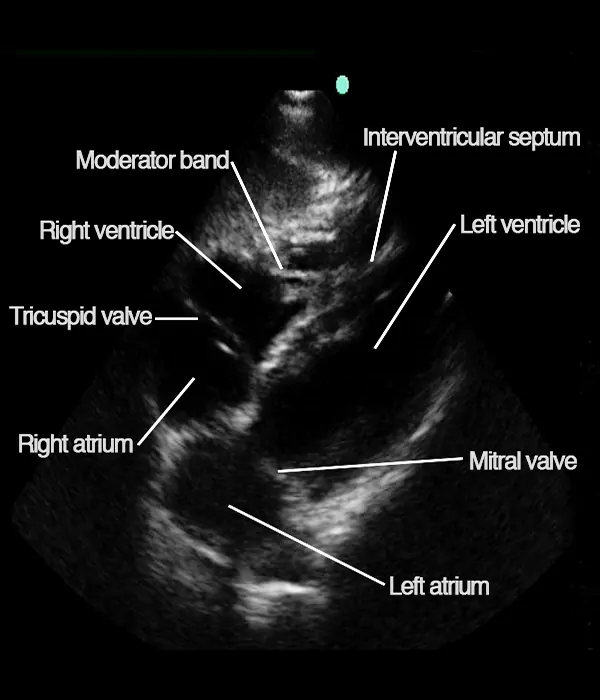
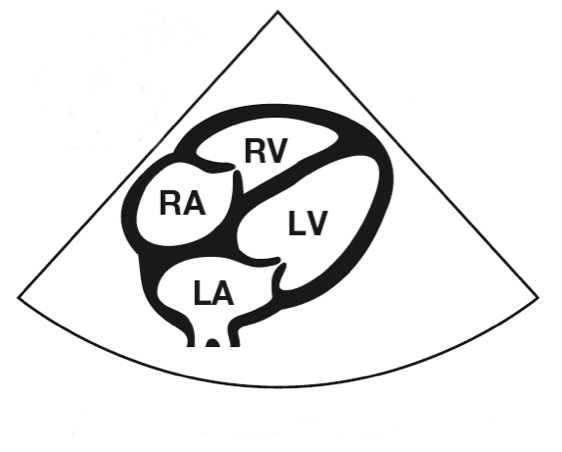
The result of eyeballing the 4 cardiac views below would be: no pericardial effusion, no signs of Type A aortic dissection present, normal left ventricular function, no signs of pulmonary embolism present.

Image missing
The four cardiac views

Is a pericardial fluid collection present?


Facts
A fluid collection can be seen in in all cardiac views.
Look for a anechoic(black) border around the heart.

Tips
A fluid collection large enough to cause hemodynamic instability will most often also be visible in the subcostal view between the liver and the right side of the heart closest to the transducer.

Image missing
Pericardial fluid collection in all four cardiac views.

The apical 4-chamber view – identifying structures


These important structures are seen in the apical 4-chamber (AP4CH) view:
• Left atrium
• Left ventricle
• Mitral valve
• Right atrium
• Right ventricle
• Tricuspid valve
• Septum intraventriculare

The following focused questions can be assessed:
• Is a pericardial effusion present?
• Is the left ventricular function reduced?
• Are signs of pulmonary embolism present?

This view is especially valuable for assessing left ventricular function and signs of pulmonary embolism.

Image missing
Normal apical 4-chamber view.

The apical 4-chamber view – tips and tricks


Remember: The OM should be pointed to the patient’s left side (not towards the left shoulder).

Get good images
If no image can be obtained: if possible, try moving the patient unto his/her left side and place the transducer more laterally.

If the right ventricle is in the center of the image: slide the transducer more laterally to visualise the left ventricle.

Image missing
Schematic drawing of the apical 4-chamber view
RA: Right atrium
RV: Right ventricle
LA: Left atrium
LV: Left ventricle

The parasternal long-axis view – identifying structures

These important structures are seen in the parasternal long axis (PLAX) view:
• Left atrium
• Left ventricle
• Mitral valve
• Right ventricle
• Septum intraventriculare
• Ascending aorta and aortic valve

The following focused questions can be assessed:
• Is a pericardial effusion present?
• Is the left ventricular function reduced?
• Are signs of pulmonary embolism present?
• Are signs of ascending aortic aneurism/dissection present?

This view is essential for the assessment of ascending aortic aneurism/dissection.

Image missing
Parasternal long-axis view.

The parasternal long-axis view – tips and tricks


Remember: the OM should be pointed directly towards the right shoulder.

Get good images
Generally: stay close to the border of the sternum.

To “open up” the LV in both planes: do small tilting and rotational movements – one at a time.

If the image is grainy: try to press slightly harder and let the transducer rest on the underlying costa.

Image missing
Schematic drawing of the parasternal long axis view
RV: Right ventricle
LA: Left atrium
LV: Left ventricle
AO: Ascending aorta

The subcostal 4-chamber view – identifying structures


The following important structures are seen in the subcostal 4-chamber view:
• Left atrium
• Left ventricle
• Mitral valve
• Right atrium
• Right ventricle
• Tricuspid valve
• Septum intraventriculare

The following focused questions can be assessed:
• Is a pericardial effusion present?
• Is the left ventricular function reduced?
• Are signs of pulmonary embolism present?

A good subcostal 4-chamber view is valuable for assessing all three of the above mentioned focused questions – but especially for pericardial effusion assessment.

Image missing
Normal subcostal 4-chamber view.

The subcostal 4-chamber view – tips and tricks


Tips and tricks

In order to obtain the subcostal acoustic window, sufficient pressure needs to be applied to the transducer so the ultrasound waves can travel under the rib cage as seen in the image below.

Asking the patient to bend his legs often helps as this causes relaxation of the abdominal muscles allowing for correct transducer placement.

Asking the patient to take a deep inspiration often improves image quality because the heart is displaced towards the abdomen and the transducer (remember to tilt the tail of the transducer upwards).

Once you have found an acoustic window, try optimizing the image (tilting and rotating) so the cavities are fully open. Often, a 10 degree counter-clockwise rotation is necessary.

If you get a lung-shadow across the apex, try sliding the transducer a little towards the patient’s right side.

Image missing
Schematic drawing of the subcostal 4-chamber view
RA: Right atrium
RV: Right ventricle
LA: Left atrium
LV: Left ventricle