lang-en

XX 30 – Scanning procedure

Recall the content of the scanning guide on the previous pages

Holding the probe in your right hand:
1. apply gel without touching the footprint of the probe with the gel dispenser
2. place the transducer on the chest wall where you expect to get the desired image
3. move your hand in small circles until you recognise any anatomical structures on the screen
4. then stop circling and optimise the image in only one plane at the time by means of:
– rotating
– tilting
– sliding
the transducer

Never move the probe in more than direction at the time
When you are familiar with this scanning procedure proceed to the next page

Image missing
Figure showing movements in three different spatial directions
The icon at the bottom indicates that movement should only take place in one plane at the time

Before you start scanning

The key to successful imaging for beginners is to use a systematic approach

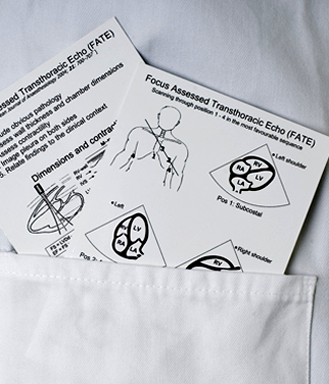
Always have the FATE card in front of you or use the posters available during the workshops

Ask yourself – and during the workshop also the rest of the group:
1. Which position – 1, 2, 3 or 4?
2. How should I hold the probe?
3. Whereto should the orientation marker (OM) be pointed?
4. What should appear on the screen?

Image missing
Scanning guide available as posters on the workshops – use it to optimize learning

FATE position 1: The subcostal view

The FATE position 1 is called the subcostal or subxiphoid view

The subcostal view is a 4 chamber view, imaging all 4 chambers of the heart

The position obtained in position 1 is indicated on page 1 of the FATE-card

The subcostal 4-chamber view is suitable for a quick qualitative evaluation of:
– pathology (pericardial effusion, pulmonary embolus)
– wall thickness
– chamber dimensions
– bi-ventricular function

You will now be taken through the positions in detail, focusing on how to obtain and interpret the right 2D ultrasound image

Image missing

Position 1 and the FATE card

Page 1 on the FATE card is used for this part of the FATE examination

Position 1 is indicated on the FATE torso in the lower right corner of the card

The image in the upper left corner of page 1 of the FATE card is the target image to be obtained in position 1

Study the FATE card, and memorize position 1 and the target image before beginning the examination

Image missing

XX 28 – Position 4: Conventions and use of pleural views

By convention the orientation indicator on the screen is placed at the right side of the screen by the cardiologists, but on the left side of the screen by radiologists and emergency physicians

Since the orientation marker on the transducer should point in the cranial direction, the diaphragm is seen on the right side of a cardiologist’s screen (when cardiac transducer in chosen) and on the left side of a radiologist’s / emergency physician’s screen (when non-cardiac transducers are employed)

This can be a bit confusing, but is easily adapted when the convention is understood

The pleural views are suitable for evaluation of:
– Pleural effusion
– Atelectasis/lung parenchyma
– Pneumothorax
– Pulmonary edema
– Correct intubation confirmed by bi-lateral lung sliding

Image missing

XX 22 – Position 3: Parasternal long axis view (PLAX)

The parasternal long axis view (PLAX) is obtained from position 3 by aiming the orientation marker of the transducer at the patients right shoulder

In this view these cardiac structures can be visualized:
– Left atrium (LA)
– Left ventricle (LV)
– Right ventricle (RV)
– The aortic root (AO)
– The mitral valve

Image missing

XX 23 – Position 3: PLAX ultrasound image

The parasternal long axis view (PLAX) on the right shows how the image should appear by convention on the screen

Observe the base of the heart at the right side of the screen, and the apex of the heart at the left side of the screen – in contrast to the subcostal 4-chamber view

In this view the aortic (AO) and mitral valves (MV) can be evaluated

The parasternal long axis view is suitable for a quick evaluation of:
– Pathology
– Wall thickness (M-mode)
– Chamber dimensions (M-mode)
– Mitral septal separation (M-mode)
– Aortic and mitral valves

Image missing

XX 24 – Position 3: Parasternal short axis view (PSAX)

The parasternal short axis view (PSAX) is obtained from position 3 by aiming the orientation marker on the transducer at the patient’s left shoulder

In this view two cardiac chambers can be visualized:
– Left ventricle (LV)
– Right ventricle (RV)

Image missing

XX 25 – Position 3: PSAX ultrasound image

The parasternal short axis view (PSAX) on the right shows how the image should appear by convention on the screen

This view is suitable for a quick evaluation of:
– Pathology
– Dimensions of cavities: Left and right ventricle
– Myocardium: Left and right ventricle
– Left ventricular function:
– Global
– Regional (Myocardium with blood supply from all three coronary arteries represented)

Image missing

XX 27 – Position 4: Pleural views

The pleural views are obtained from position 4

As part of the FATE examination these structures should be visualized:
– Liver (right side)
– Spleen (left side)
– Diaphragm (both sides)

Image missing