AU-cardiac

Full basic FATE examination

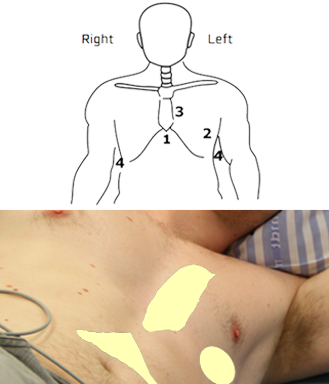
A full basic FATE examination includes images of the heart and pleura obtained from four different positions, or “windows”, on the thorax

From these positions 6 imaging views can be achieved:
– Position 1: Subcostal 4-chamber view
– Position 2: Apical 4-chamber view
– Position 3: Parasternal views. The long-axis and short-axis view
– Position 4: Pleural views. Right pleura and left pleura

This lesson will give an overview of the 6 imaging views and how to achieve them

Image missing
The image shows the FATE positions on the thorax and corresponding cardiac positions on a human body.

The FATE card and abbreviations

The FATE card is made to assist your memory

The FATE card shows you:
– Where to place the transducer on the thorax for each of the four
positions
– The direction of the transducer orientation marker (OM)
– The rotation of the transducer
– The expected sonographic image

Standard cardiac abbreviations used throughout the course:
LA = left atrium
RA = right atrium
LV = left ventricle
RV = right ventricle
AO = aorta
IVS = interventricular septum
IAS = interatrial septum

You can download the FATE card from Google Play or the AppStore

Image missing

Manipulating the probe

A terminology to describe the movement of the probe during scanning is important in order to optimise the image

During the workshop it makes it easier for the supervisor to give instructions without touching the probe which is crucial for the novice in order to achieve practical skill

There are many available descriptions of the method of manipulation of the probe

We recommend using:
1. rotation
2. tilt
3. slide

These movements are applicable to all scanning locations

As a novice – always, only move the probe in one direction at a time

Image missing
Figure showing movements in three different spatial directions
The icon at the bottom indicates that movement should only take place in one plane at the time

XX 9 – Instruction in manipulation of the probe

During the workshops the supervisors are encouraged to give instructions with reference to the tail of the transducer and a secondary reference point when appropriate

Examples of secondary reference points:
1. anatomical land marks in relation to the volunteer or patient
2. physical land marks like the bed
3. spatial: left/right – upwards/downwards – medial/lateral

When complying with an instruction, never do any movements in other directions

Image missing
Transducer manipulations with reference to the tail of the probe and four different secondary reference points: X, Y, Z ,V

XX 4 – The orientation marker on the transducer

The probe is fitted with an orientation marker (OM)

On the image the OM is indicated by a green arrow

The OM facilitates the correct orientation of the probe on the patient

Image missing
The OM (green arrow) has to be oriented in correct relationship with the corresponding orientation indicator (OI) on the monitor

Display of the sector on the screen

In FATE and adult cardiac ultrasound, the ultrasound image displays the sector with the two radii diverging from the top of the screen

The orientation indicator is on the right side of the screen, and the arch of the sector is displayed towards the bottom of the screen

The ultrasound image on the screen can be turned upside/down or left/right with user controls

Image missing
The video clip shows the ultrasound sector placed correctly and incorrectly. Remember that the right orientation is with the top of the sector pointing upwards, and the orientation indicator (OI) on the right side of the screen. (Please note, the video may be slow to load depending on your internet connection)