EEU

The sector and its orientation


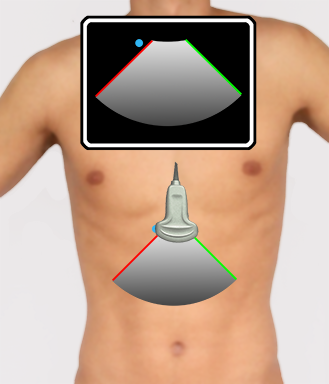
The image is generated by the transducer and the ultrasound system and displayed on the screen.

The sector is demarcated by the two radii and the arc. In the illustration below, the two radii of the sector are red and green.

The red and the green radii diverge from the probe at the top of the monitor (the skin surface).

By convention, the orientation indicator (OI – blue dot on the screen) is on the left side of the screen in conventional clinical ultrasound applications (it is the opposite in cardiac ultrasound, where the OI is placed on the right side of the screen).

When orienting the orientation marker (OM – blue dot on the transducer) to the same side as the OI on the screen, the red radius of the ultrasound beam sector corresponds to the red radius of the ultrasound image sector, and the green radius corresponds to the green radius of the ultrasound image sector.

Image missing
The image shows the ultrasound sector produced by the probe and the corresponding ultrasound image on the ultrasound screen. Notice that the OM on the left side of the transducer corresponds to the left side of the screen. The right side of the ultrasound sector (green) corresponds to the right side (also green) of the screen.

“Finger-on-transducer” test


The transducer has an orientation marker (OM).

The OM facilitates the correct orientation of the transducer when scanning the patient.

The OM has to be oriented correctly with the corresponding orientation indicator (OI) on the monitor.

When in doubt use the “finger-on-transducer” test explained in the video below – press the PLAY triangle to watch the video

The video-clip shows the “finger-on-transducer” test – touching of the left side of the transducer is displayed as a movement in the ultrasound image on the left side of the screen when the probe is oriented correctly.

Manipulating the transducer


A shared terminology to describe the movement of the transducer during scanning is important in order to optimize the image.

During the workshop it makes it easier for the supervisor to give instructions without touching the transducer which is crucial for the novice in order to achieve practical skill.

There are many available descriptions of the method of manipulation of the transducer.

We recommend using:
1. rotate (right – clockwise, left – counterclockwise)
2. rock (in-plane motion away or toward the indicator)
3. tilt (angling the transducer – perpendicular to rocking)
sweep (is tilting with a continuous fanning motion back and forth)
4. slide (moving the transducer on the skin)

As a novice you should only manipulate the transducer in one direction at a time.

Image missing
Figure showing movements in three different spatial directions. Confused? Look at the video in the next topic!

Use of the ultrasound system


A systematic approach will facilitate successful scanning:

• Ensure a power supply for the procedure – either a connection to a network voltage, or sufficient battery capacity
• Turn on the ultrasound system
• Select your transducer
• Choose preset (predefined setting appropriate for a specific examination)
• Obtain view
• Adjust the depth setting
• Adjust the gain setting
• Interpret the findings

Image missing
Different point-of-care ultrasound systems

Which transducer?


Three types of transducers are used in basic emergency ultrasound:
• Linear transducers
• Wide footprint curved abdominal transducers
• Smaller footprint cardiac transducers

Transducer characteristics, such as frequency, determine the ultrasound image quality.

Linear transducers are high frequency transducers suitable for visualisation of superficial structures like the pleural line and peripheral vessels.

A low-frequency transducer like the curved abdominal transducer is suitable for better penetration of tissues in the abdominal and thoracic cavity.

The cardiac transducers are especially designed to visualise the moving heart and are also suitable for assessing pleural fluid.

Image missing
Different ultrasound transducers – each made for a special purpose

The hand is holding the preferred transducer type for cardiac examinations

Which preset?


The presets relevant for basic emergency ultrasound are:
• Lung
• Cardiac
• Abdomen

When possible, the appropriate preset for a given examination should always be selected.

In most ultrasound systems, the presets are chosen automatically when inserting or activating the relevant transducer.

A given preset for a given examination is not necessarily the optimal preset.

Different presets can be tried out to get the best image.

Image missing
Ultrasound system with preset menu open

What is ultrasonography?


Imaging
Ultrasonography is an imaging method based on ultrasound.

Ultrasonography uses the impulse-echo principle of generating and emitting short pulses of ultrasound that are reflected at tissue interfaces and subsequently recorded by the receiver.

The reflected sound wave is essential for the production of the ultrasound images.

Image missing
The illustration shows the emission of sound from the transducer and reflection of the signal at tissue interfaces. The ultrasound waves that hit an interface, here a bone, reflect the ultrasound. The waves that do not hit anything do not generate any echo.

Frequency, penetration and resolution


Frequency
The frequency of a sound wave is equal to the number of wave tops per time unit.

The SI unit for frequency is Hertz (Hz) = wave tops pr second.

Ok, so that does not sound simple…

This is what you need to know:
The longer the distance the sound wave travels, the more energy is lost to absorption.

The ability of a sound wave to penetrate through tissue depends on the frequency of the sound wave – a lower frequency (lower number of wave tops) gives a better penetration.

On the other hand, a higher frequency (more wave tops) causes a higher resolution, but a lower penetration.

Image missing

Ultrasound made simple


The first look at an ultrasound machine can be an intimidating experience.

You see a bunch of unfamiliar buttons and knobs and confusion sets in. The user manual is often poorly designed, which only adds to the confusion. You turn it on, stare at a screen, and feel lost.

But, it can be made simple and easy, and you can quickly master the machinery through a basic understanding of ultrasound and by using a few controls.

Learn the few essential buttons – On/Off, select transducer, select preset, adjust gain and depth – and you are up and running.

Image missing
Cannot find the right buttons ….. aaaargh !!!