As previously illustrated, the orientation indicator (OI) typically appears as a ‘dot’ on the ultrasound screen’s left side. On the transducer, you’ll find a corresponding orientation marker (OM).
For accurate, non-mirrored imaging, ensure the transducer’s OM aligns with the screen’s OI.
If you’re ever uncertain about proper alignment, use the ‘finger-on-transducer’ test as demonstrated in the video below.
Click on the PLAY icon to view the tutorial.
The video-clip shows the “finger-on-transducer” test – touching of the left side of the transducer is displayed as a movement in the ultrasound image on the left side of the screen when the probe is oriented correctly.
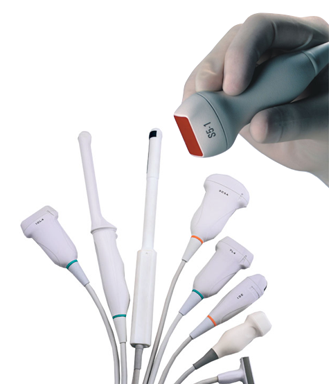
Three types of transducers are used in basic perioperative ultrasound:
• Linear transducers
• Wide footprint curved abdominal transducers
• Smaller footprint cardiac transducers
Transducer characteristics, such as frequency, determine the ultrasound image quality.
Linear transducers are high frequency transducers suitable for visualisation of superficial structures like the pleural line and peripheral vessels.
A low-frequency transducer like the curved abdominal transducer is suitable for better penetration of tissues in the abdominal and thoracic cavity.
The cardiac transducers are especially designed to visualise the moving heart and are also suitable for assessing pleural fluid.
Different ultrasound transducers – each made for a special purpose
The hand is holding the preferred transducer type for cardiac examinations
A systematic approach will facilitate successful scanning:
• Ensure a power supply for the procedure – either a connection to a network voltage, or sufficient battery capacity
• Turn on the ultrasound system • Select your transducer • Choose preset (predefined setting appropriate for a specific examination)
• Obtain view
• Adjust the depth setting
• Adjust the gain setting
• Interpret the findings
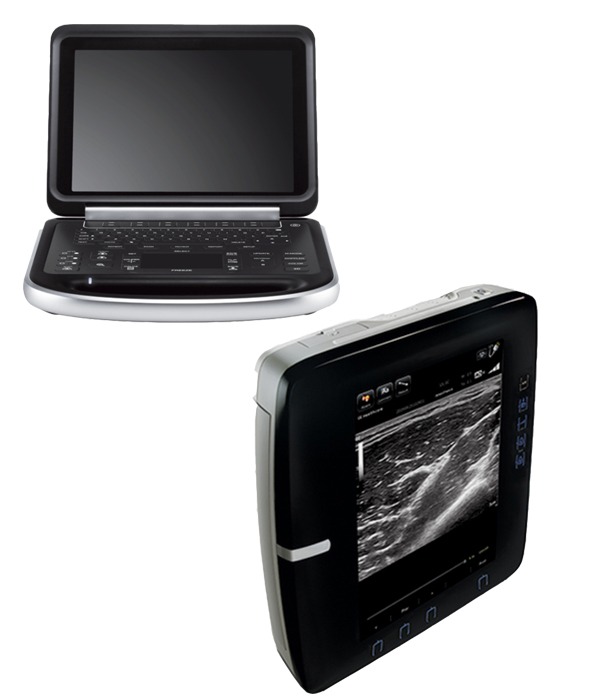
Different point-of-care ultrasound systems
Which transducer
Different ultrasound transducers – each made for a special purpose. The hand is holding the preferred transducer type for cardiac examinations
Three types of transducers are used in basic perioperative ultrasound:
• Linear transducers
• Wide footprint curved abdominal transducers
• Smaller footprint cardiac transducers
Transducer characteristics, such as frequency, determine the ultrasound image quality.
Linear transducers are high frequency transducers suitable for visualisation of superficial structures like the pleural line and peripheral vessels.
A low-frequency transducer like the curved abdominal transducer is suitable for better penetration of tissues in the abdominal and thoracic cavity.
The cardiac transducers are especially designed to visualise the moving heart and are also suitable for assessing pleural fluid.
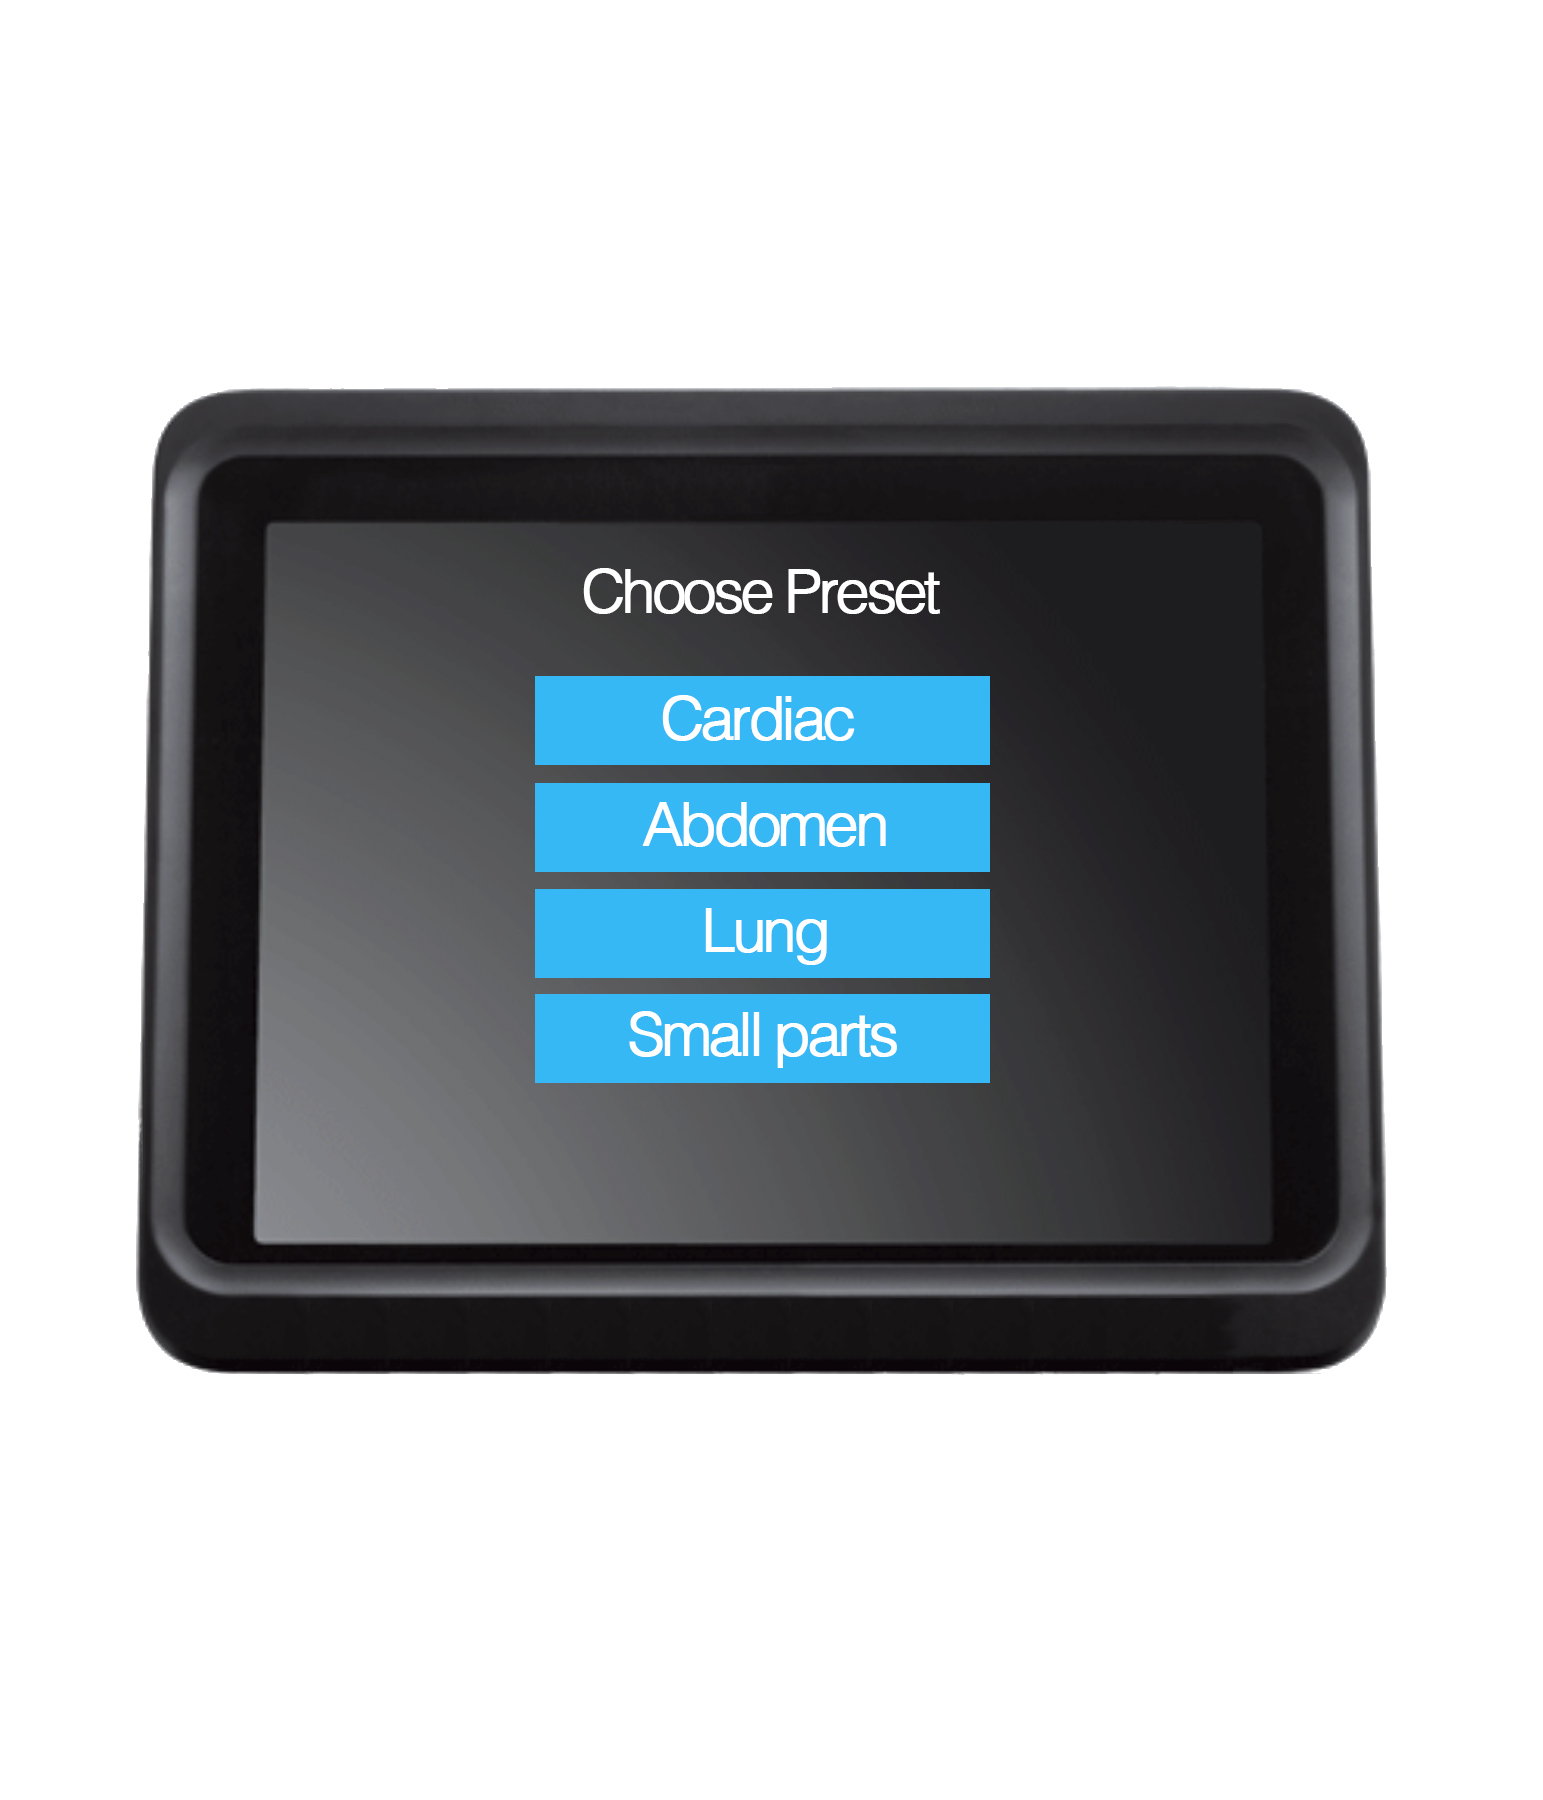
Which preset?
Ultrasound system with preset menu open
The presets relevant for basic perioperative ultrasound are:
• Lung
• Cardiac
• Abdomen
When possible, the appropriate preset for a given examination should always be selected.
In most ultrasound systems, the presets are chosen automatically when inserting or activating the relevant transducer.
A given preset for a given examination is not necessarily the optimal preset.
Different presets can be tried out to get the best image.
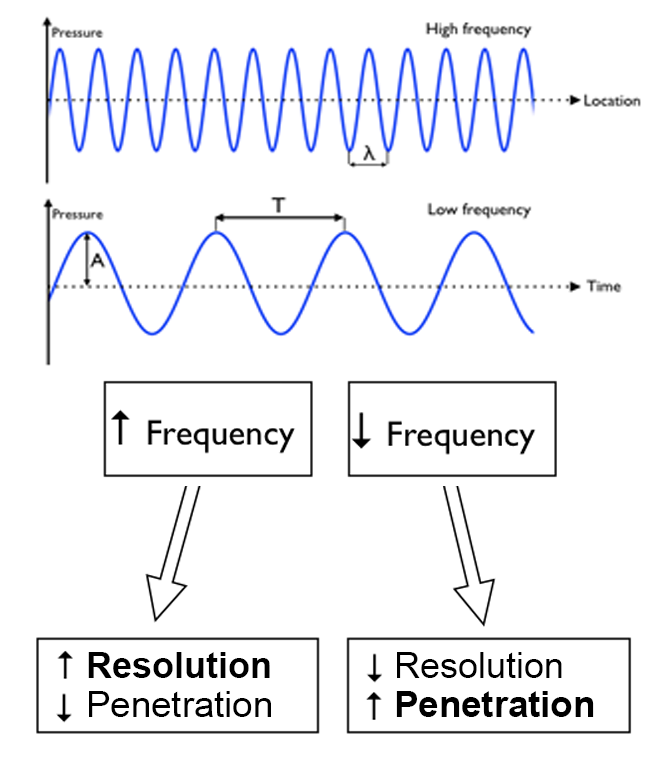
Frequency
The frequency of a sound wave is equal to the number of wave tops per time unit.
The SI unit for frequency is Hertz (Hz) = wave tops pr second.
Ok, so that does not sound simple…
This is what you need to know:
The longer the distance the sound wave travels, the more energy is lost to absorption.
The ability of a sound wave to penetrate through tissue depends on the frequency of the sound wave – a lower frequency (lower number of wave tops) gives a better penetration.
On the other hand, a higher frequency (more wave tops) causes a higher resolution, but a lower penetration.
Imaging
Ultrasonography is an imaging method based on ultrasound.
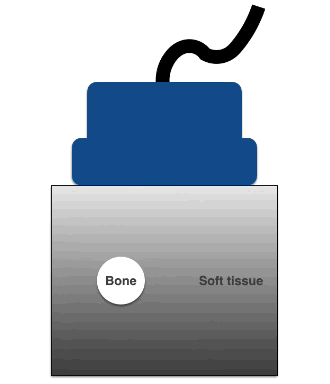
Ultrasonography uses the impulse-echo principle of generating and emitting short pulses of ultrasound that are reflected at tissue interfaces and subsequently recorded by the receiver.
The reflected sound wave is essential for the production of the ultrasound images.
The illustration shows the emission of sound from the transducer and reflection of the signal at tissue interfaces. The ultrasound waves that hit an interface, here a bone, reflect the ultrasound. The waves that do not hit anything do not generate any echo.
Physics
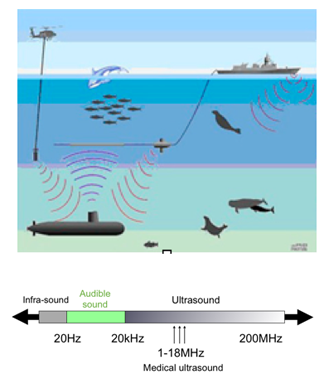
In physics, sound waves are vibrations that travel through various mediums. The word “ultrasound” refers to sound with a high-frequency sound the human ear cannot perceive and with the capability to peek inside the body
Application
Ultrasound is used among other things as a sonic depth finder in navigation, for cleansing of sensitive objects (e.g. contact lenses) and in testing non-disruptive materials in order to detect faults and fractures.
In medical diagnostics, ultrasound can be used for visualisation of anatomical structures and for assessment of physiological processes.
The ultrasound used for medical diagnostics usually has a frequency between 2 and 18 MHz.
The first look at an ultrasound machine can be an intimidating experience.
You see a bunch of unfamiliar buttons and knobs and confusion sets in. The user manual is often poorly designed, which only adds to the confusion. You turn it on, stare at a screen, and feel lost.
But, it can be made simple and easy, and you can quickly master the machinery through a basic understanding of ultrasound and by using a few controls.
Learn the few essential buttons – On/Off, select transducer, select preset, adjust gain and depth – and you are up and running.
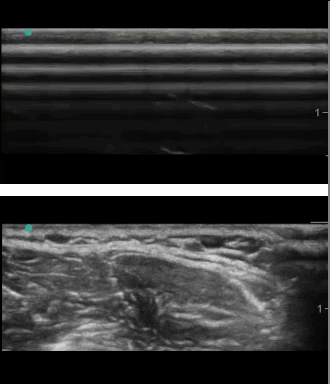
To ensure maximum transmission of ultrasound into the tissue, the application of ultrasound gel is very important.
Remember always to use a sufficient amount of gel.
The video shows two different ultrasound images of the same blood vessel at the wrist in the same patient, when sufficient and insufficient amounts of ultrasound gel is used. In the upper image the probe is placed on a “dry” arm, and in the lower image a sufficient amount of gel was used.
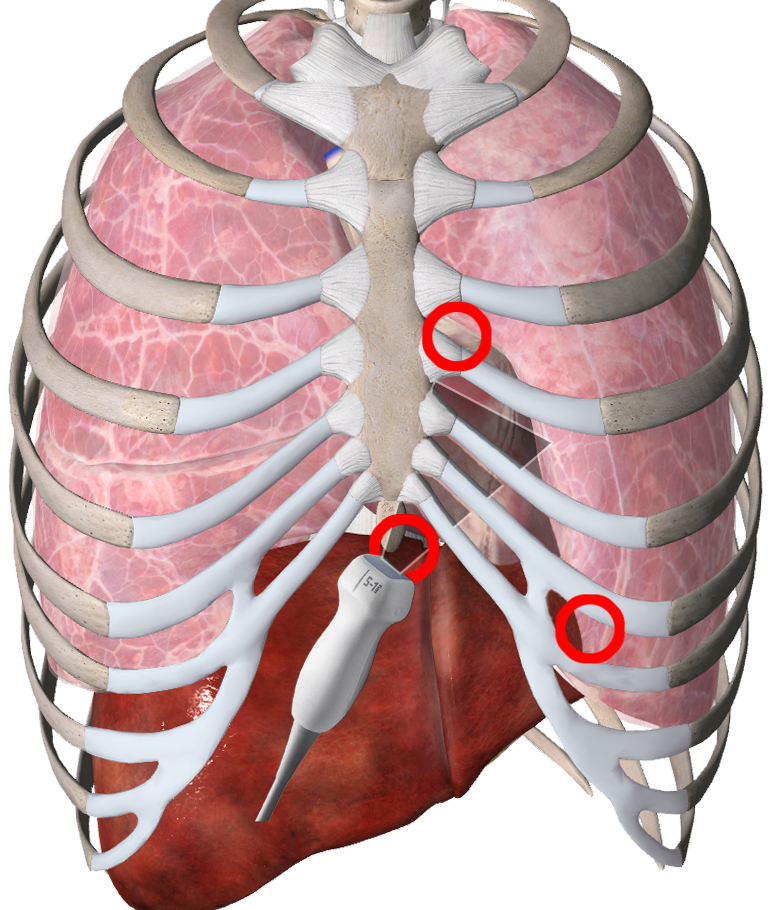
Bone and air do not allow ultrasound penetration. Since most of the thorax consists of bone and air it can be hard to find ‘a passage’ through which the ultrasound waves can travel to get an image of the deeper structures e.g. the heart.
Such an area of passage is called an ‘acoustic window‘.
Acoustic windows are often small with a narrow passage for the ultrasound waves.
Use this strategy when scanning:
• ‘Scout scan: ” Slide the transducer with large movements over the skin, and look for target structure. Then use smaller movements to place the transducer on the acoustic window
• Optimize the view by rocking, rotating or tilting the transducer
• If the image disappears then start again by finding the acoustic window (sliding) before trying to optimize
If you have not found an acoustic window you will not gain anything by rocking, tilting or rotating the transducer, just like tilting your head will not help you look through a door – you need to find the keyhole first.
Image showing three common acoustic windows: the parasternal area, the subcostal area and the apical area.