FATE

34 – Join the USabcd Advanced FATE workshop

After having completed the e-learning module, the next step is to attend one of our hands-on-training (HOT) courses

You can join any one of these which are offered in more than 20 different countries

All aAdvanced FATE courses are standardised with a comprehensive and very structured learning program

The courses are lead by one of our experienced chief instructors who ensures that all learning objectives are fulfilled while the supervisors at the workstations are often local experts

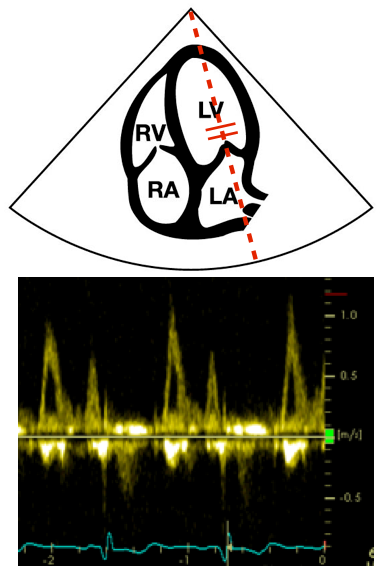
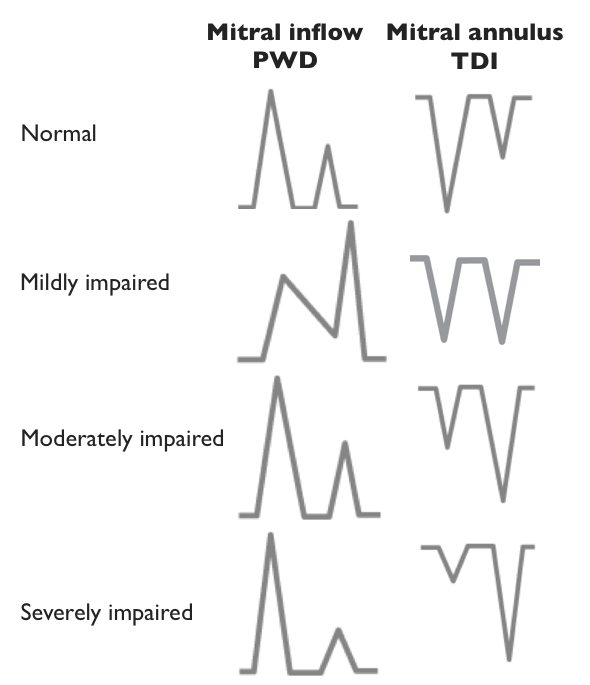
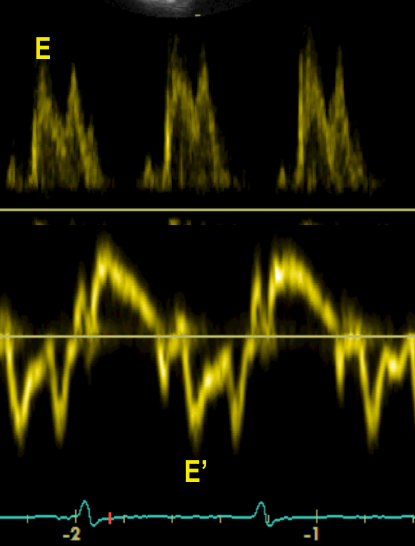
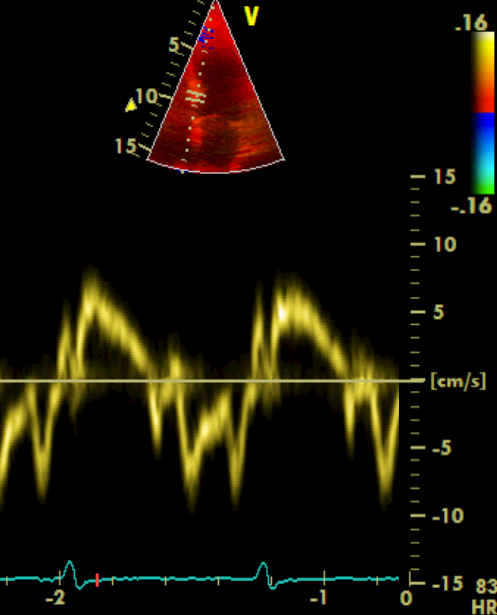
After the Advanced FATE course you will be able to use 2D, pulsed wave and tissue Doppler imaging for the evaluation of diastolic function

Image missing
Activity at the ultrasound machines is a prerequisite to become a US expert (course in India. The practical training that matches the content of this e-learning module is covered in HOT 3
If you want to see the content of HOT 3 click on “Read more”

Summary of diastolic function


You have now learned:

– How to correctly record mitral inflow with pulsed wave Doppler
– How to correctly perform a tissue Doppler recording at the mitral annulus
– How to interpret the velocity curves
– To identify the changes in velocity curves at different stages of compromised diastolic filling
– How to combine PWD and TDI for the evaluation of diastolic function
– The most important pitfalls and limitations

Remember, it is when you press the Doppler buttons that you are most likely to make the biggest mistakes in point-of-care ultrasound

Image missing

Diastolic function – Important points


Assessment of LV diastolic function in the point-of-care context should primarily focus on the presence of:
– Increased myocardial thickness
– Left atrial enlargement
– Mitral inflow PWD and TDI abnormalities

Think of diastolic dysfunction in the presence of the the following:
– Myocardial systolic dysfunction
– Aortic calcification with stenosis
– Ischaemic heart disease
– Myocardial deposit diseases
– Beta-1 stimulation

Combining pulsed wave Doppler and tissue Doppler enhances the assessment of diastolic function:
– The combination of E and E’ is the strongest tool

Diastolic dysfunction assessment is a challenge even to experts

Image missing
Diastolic function
Characteristics for mitral inflow curves and mitral annulus tissue Doppler curves as diastolic dysfunction develops

LV diastolic dysfunction: The most important pitfalls


A comprehensive evaluation of the diastolic function requires the use of all available 2D and Doppler methods

Data acquisition and analysis are very user dependent making repeated measures difficult to interpret

Evaluation of the diastolic function works best under standardised and maximum physiological conditions

Evaluation in the critically ill patient is prone to inaccuracies depending on:
– Ventilation
– PEEP/CPAP
– Volume state
– Inotropes
– Vasoconstrictors
– Presence of effusions (pleural, pericardial and abdominal)

Image missing
In critical care in particular, confounders are in abundance affecting the evaluation that can be very unreliable

Diastolic dysfunction in the clinical setting


Significance of LV diastolic dysfunction

With worsening diastolic function, left ventricular filling pressures increase leading to pulmonary congestion and ultimately pulmonary oedema

LV hypertrophy causes myocardial stiffness and reduced LV systolic function which can be diagnosed echocardiographically as impaired longitudinal contraction (affecting primarily endocardial longitudinal fibers)

Image missing
Top: Pulmonary congestion indicated by multiple B-lines
Bottom: Reduced longitudinal contraction is an early sign of diastolic dysfunction in LV hypertrophy

Diastolic dysfunction in the clinical setting


Major causes of LV diastolic dysfunction
– Aging

– Arterial hypertension

– Aortic stenosis

– Left ventricular failure

– Ischaemic heart disease

– Mitral valve calcification

– Myocardial deposition disease

– Combinations of the above

Image missing
On the FATE card you find the most important pathology you should recognise

How to calculate E/E’


The calculation of E/E’ is machine dependent

This example is based on GE machines:
1. From the mitral inflow curve mark E by using the measurement and analysis button and choosing E/A analysis
2. From a tissue Doppler velocity curve, mark E’ using the measurement and analysis button and selecting E’ analysis
3. The machine automatically calculates E/E’

This analysis can be done on- or offline from stored images of the mitral inflow and mitral annulus tissue Doppler images

Image missing
E/E’ in a patient with severe diastolic dysfunction as it appears on the screen after calculation

E/E’ = 22.46 (yellow arrow)

Combining mitral inflow Doppler recording with TDI


By combining transmitral ulsed wave Doppler with mitral annulus tissue Doppler velocities, the reliability of the diastolic function assessment can be significantly improved

E (obtained from transmitral PW Doppler) is divided by E’ (obtained from mitral annulus tissue Doppler recording) at the interventricular septum or lateral wall or both = E/E’ (E/E prime)

Normal E/E’ ratios are:
< 8 for TDI measured at the interventricular septum
< 10 for TDI measured in the lateral wall

Image missing
Top: E measured from the transmitral pulsed wave Doppler inflow curve
Bottom: E’ measured at the mitral annulus at the interventricular septum

Step-by-step recording of tissue Doppler velocity curve in real time


In this example the septal wall of the mitral annulus is used

1. Display the correct apical 4 chamber view on the screen
2. Activate tissue Doppler imaging
3. Place the cursor sample volume 1 cm from the mitral annulus on the LV side
4. Activate pulsed wave Doppler
5. Adjust baseline and scale
6. Freeze the image when a high quality velocity curve is displayed on the screen

The methodology is company and machine dependent
Some machines allow tissue Doppler velocity curves to be made off-line from stored TD images

Image missing
Tissue Doppler imaging superimposed on the apical 4 chamber view
Tissue Doppler sample volume is placed at the mitral annulus at the interventricular septum

Tissue Doppler imaging sampling points


The measuring points for tissue Doppler imaging (TDI) are approx. 1 cm from the mitral annulus on both the interventricular septal and the lateral ventricular wall

An apical 4 chamber view is used

Keep the Gain low

Maintain aliasing velocity of 15-20 cm/s

Sample volume (SV) should be narrow – 2-3 mm

Maintain a high frame rate (colour bar) >150/s

Today most machines with TDI capabilities have dedicated buttons and appropriate presets and features for the analysis

Image missing
Apical 4 chamber view indicating the correct sample points