studmed

LK-test – Pleural sinus and the diaphragm – overview

Bodytext1
Examination of the pleural sinus is performed in order to exclude or confirm the presence of pleural effusion

The examination involves three steps:

1. Find the abdominal reference point – liver on the right side and spleen on the left side

2. Move the transducer cranially and identify the diaphragm and the tip of the lung

3. Check for presence of hypoechoic (black) areas present between the diaphragm and visceral pleura or between the parietal and visceral pleural sheets

Image missing

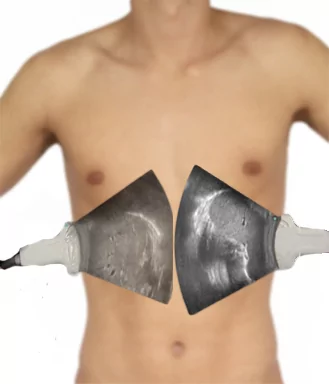
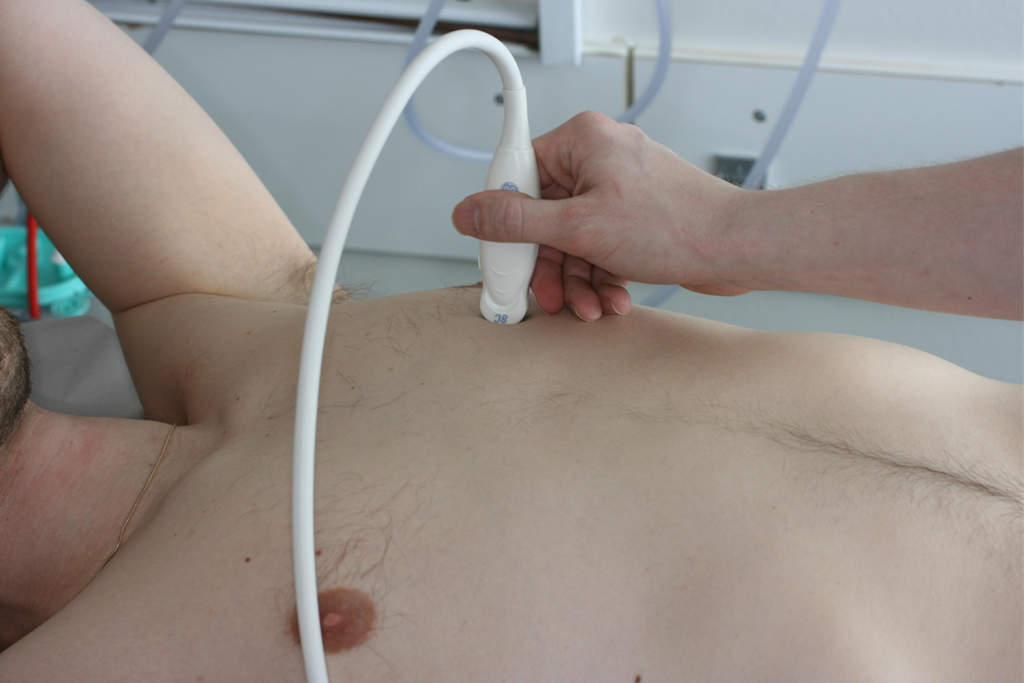
Fact text: The image depicts the typical transducer positions when assessing the sinus

LK-test – Introduction to lung ultrasound (LUS)

Bodytext1
In recent years, lung ultrasound has become popular as a clinical point-of-care tool in a variety of settings

The application of ultrasound for lung diagnostics has been considered impossible due to the air content of the normal aerated, as opposed to the sonographic examination of e.g. muscular and subcutaneous tissue not containing air

Deeply situated and aerated chest structures covered by bone can easily be examined with conventional ionising techniques like conventional X-ray and computed tomography (CT)

This accessibility of alternative techniques has been an obstacle to the development of lung ultrasound

Image missing

Fact text: The image demonstrates lung ultrasound of the left hemithorax

LK-test – Normal lung and chest wall anatomy

Bodytext1 The lungs are protected and contained inside the chest cavity by the chest wall. The chest wall consists of ribs (syn: costae), and the soft tissues including muscles between the ribs in the intercostal space

The inside of the chest wall is covered by the parietal pleura, and the lung by the visceral pleura. The pleural space is delimited by the visceral and the parietal pleura

The visceral and parietal pleura normally lie close together with just a thin film of fluid in the pleural space

The visceral and parietal pleura slide against each other in synchrony with respiration

Click on the blue expand button for a bigger picture

Image missing

Fact text: The figure shows the lungs contained inside the chest cavity
At the lower right side a squared section of the chest wall icon is magnified in order to show the different tissue components of the chest wall – lung, visceral and parietal pleura, ribs and intercostal space

LK-test – Ultrasound presentation of the chest wall

Bodytext1
Costae
The costae are identified by the hyperechogenic (white) surface and the hypoechogenic (black) shadow below the costa

Pleura
Pleura is seen as a hyperechogenic (white) structure between the costae

Things are not always as they seem
OBSERVE: Image structures below the pleura line do not represent lung tissue – the air in the lungs absorbs the ultrasound waves and returns no echoes. Structures seen in the image below the pleura line is not lung tissue but represent image artefacts from the echoes from the skin, muscle, costae and pleural line

Image missing

Fact text: The image shows the presentation of the chest wall on the ultrasound screen
The linear ultrasound probe is placed on the skin surface over the sucutaneous fat layer, costae and intercostal muscles
The lower part of the picture shows the ultrasound image of the tissue components of the chest wall

LK-test – Learning objectives

Bodytext1
Understanding and performing basic lung ultrasound requires knowledge about:

– How to prepare the ultrasound system

– How the lung, pleura and chest wall structures appear on the ultrasound screen in 2D and M-mode mode

– The basic sonographic signs and artefacts used in lung ultrasound

– How to perform a basic lung examination using scanning zones

– How to identify or rule out pneumothorax, pleural effusion, and interstitial syndrome

– How to use lung ultrasound as an integrated part of goal directed patient assessment

Image missing

Fact text: The image shows the concept of the “bat-sign”

LK-test – The ”bat sign”

Bodytext1 The term ”bat sign” was described by Dr. Daniel Lichtenstein, in respect of the capacity of this animal to use ultrasound navigation very accurately

Identification of the ”bat sign” confirms that the ultrasound image represents the space between two ribs, and the hyperechogenic (white) linear structure between the ribs is pleura

In addition, the depth of the ultrasound image can be adjusted in order to align the pleura to the centre of the ultrasound screen

The ”bat sign” should always be obtained, before the pleura is evaluated

Image missing

Fact text: The image shows a bat at the top and an ultrasound presentation of the chest wall at at the bottom. The bat sign is drawn with a red line.

LK-test – The ”lung sliding” sign

Bodytext1 The most important dynamic sign to be checked is the ‘‘lung sliding’’. It is a subtle and bright horizontal movement of the pleural line in synchrony with the respiratory cycle indicating sliding movement of the visceral pleura against the parietal pleura

Lung sliding is due to the up and down movement of the lung in synchrony with the piston-like respiratory movement of the diaphragm

The sonographic resolution does not allow distinction between the two pleural layers – they present as a white pleural line

When air separates the two pleural layers, the movement disappears and cannot be detected with lung ultrasound; in that case, the parietal pleura is still visible but is immobile

Image missing

Fact text: The top image shows the white pleural line
The video below shows a horizontal movement indicated by the arrows
The horizontal movement represents sliding of the pleurae – the socalled ”lung-sliding sign”

LK-test – What is ultrasound ?

Bodytext1

Ultrasound is defined as sound with frequencies above the upper limit of the human hearing range of 20 kHz and up to 10 GHz (1010 Hz)

Its primary clinical application today is as a diagnostic tool and as a means to display anatomical structures, for which frequencies between 1 and 20 MHz are most commonly used

Other uses of ultrasound are as a sonic depth finder in navigation, for cleansing of sensitive objects (e.g. contact lenses) and in non-disruptive materials testing in order to detect faults and fractures

Image missing

No Fact text

LK-test – Biological effect and possible damage

Bodytext1
To date there have been no indications that the clinical use of ultrasound can compromise health

Ultrasound waves with an energy value below 100 W/cm2 do not cause significant tissue warming

100 W/cm2 is a limit that is not usually transcended in routine B-mode diagnostic ultrasound

Some of the effects of ultrasound that have been shown under laboratory conditions, such as the disruption of cell membranes, cavitation and formation of free radicals have not been demonstrated in the human body

To our knowledge, diagnostic ultrasound does not represent a risk factor for tissue damage

Image missing

Fact text: A fetus visualized with ultrasound

LK-test – Reflection

Bodytext1 Ultrasound imaging is based on the reflection of sound, which are detectable echoes of the transmitted pulse

Reflection is a result of acoustic impedance mismatch

Reflection attenuates the sound wave reducing transmission beyond the reflecting interface. Reflected sound waves are synonymous to echoes – Reflection can be specular or diffuse

Specular reflection happens when the sound wave strikes a smooth surface (a specular reflector). In that case, the angle of incidence equals the angle of reflection.

Diffuse (non-specular) reflection scatters the sound in multiple random directions. Diffusion occurs when the sound wave strikes small and irregular objects or interfaces in the tissue.

In a completely homogeneous medium or tissue no reflection is made, and therefore no echoes are produced.

Image missing

Fact text: The figure shows specular and diffuse reflection.